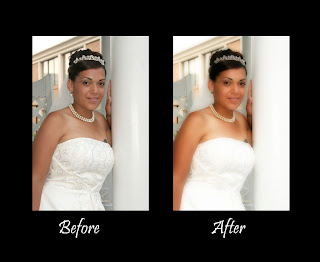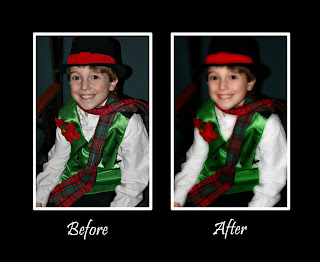

Orton Technique Instructions for Photoshop (all versions)
1. Open your photo and make any adjustments to it so that is looks it’s best (levels, unsharp mask, etc.)
2. Now you will need to duplicate your image by creating a new layer. You can do so by using the short cut keys “Control J” or by putting your cursor on the background layer and right clicking and then click on “duplicate layer”. Name this layer “Sharp”.
3. Now just repeat those steps once again, making another layer by either right clicking and selecting “duplicate layer” or by just using the short cut keys “control J”, this will give you a new layer named “Sharp copy”.
4. Click on the “Sharp copy” layer and change the blending mode to “screen”. (The blending mode is usually on normal and it has a pull down menu.)
5. With the “Sharp copy” layer selected right click and select the “merge down” option.
Now click on the “Sharp” layer and duplicate it. Name this layer “out of focus”.
Now click on the “Sharp” layer and duplicate it. Name this layer “out of focus”.
6. With the “out of focus” layer selected, use the filter menu and click on “blur” then click on “Gaussian blur”. The amount of blur depends on your photo resolution, basically you want the detail gone but the shapes in the photo to remain. A number between 15-20 usually works well. If you have six megapixel camera go with 15, if you have an eight mp camera try 17, if you have anything higher use 20.
7. Now change the blending mode of the “out of focus” layer to “multiply”.
That’s it, now just flatten your image (click on the top pull down menu “layer” and then click “flatten image”.
So next time you are in a funk, check out your photos, I'm sure there are a few (even if they are not perfect!) that you are just dying to scrap! If you have any questions please post them and I will answer and try to help out if I can! Happy Designing!
Wendy


8 comments:
These tips are wonderful!!I'm definitely gonna be trying these! Fabulous!!
lYou know that I have to try this now! Thanks so much for the info on how to photos better!
Wow! Great ideas!!!!!!! Thanks!!!
Wow, this is awesome! Thanks for the great tip!
smiles,
Cool technique!
TFS
Truly amazing Miss W! Holy cow---you are such an inspirations!
Melissa
So doing this with my next batch of pics! Fabulous, fabulous, Wendy!
---teri
Simple, clear and precise instructions! I did it tonight with a photo of DH and I and it turned out beautiful! Thank you so much!
Post a Comment