Thursday, October 30, 2008

A last minute Witches Hat!

Natalie here ;)
Since it's the the night before Halloween, maybe just a few people will be able to use this idea, sorry I'm so last minute. I decided to follow a TV thing I saw and make myself a witches hat to answer the door with.

I have sitting here in this photo, a plant pot, fabric stiffener, a pack of black cheese-cloth, a skein of fuzzy black yarn, funny shaped wood beads, and a black tinsel thing I found in the christmas section of the craft store.
Since the plant pot isn't tapered, and I coulnd't find a styro cone big enough to fit it, I used this floral foam to create a point for my hat.
I cut it into slices to best fit the diameter of the bottom of the pot, and glued the slices together before I used a bread knife to slice it into a kind of a cone shape.
Then the fabric stiffener says to cover your mold with plastic wrap. I did, and it din't want to stick so well, so I used masking tape too.
I placed my cheese-cloth in a bowl, and this is a close up of the fabric stiffener.
Then I got the cheese cloth wet in just enough water to saturate it.
Then I decided I would do as the directions on the fabric stiffener suggested and add some paint.I wondered if I mixed gold in it, if I would have an irredecent black? It didn't really make a difference, but I used it, so I'm including photos.
I also added black paint. And here is the two colors of DD "sugar coating" glitter that I will use at the end.
Onto my wet fabric I poured the fabric stiffener, gold & black paint.
Then with rubber gloves, I mixed it all up and sloshed it around. Being wet from water made this easy.
Then I took the cloth, got it out of the bowl, squeezed the excess out, and found the center of the cloth.
I placed the center of the cloth over the top of the cone and then draped it over my mold. I let the base edges of the cloth ripple around the base.I pinned around the top of the had so that I could keep my point in the fabric.
With the hat in it's shape, I sprinkled glitter over it. This mess takes almost 8 hours to dry.
Within the first 3 hours, remove the hat from the form and give it a slight pinch on two sides so it's not round but oval like a head. Letting it dry on the form will make removing it later very difficult. Also set it on a surface it will not stick to and one that will clean up easily if you added paint to the mix.
I made this yesterday, it's dry and stiff, but I still need to decorate it for tomorrow. Here's what I've done and will do...
If it's too big, I plan on sinching it up by stitching embroidery floss around the base a couple times and tying the ends to the required circumfrence.
I've spray painted some of those funny shaped wooden beads black. I am going to use the skein of fuzzy thread to stitch them to the hat in a type of band around the base. It looks fluffy, but it's actually very thin. I will stitch through the hat to the outside, string a funny shaped black bead, a small black seed bead, and then go back through the funny shaped bead to the inside of the hat. I'll exit again and repeat for another bead.
Then I have that tinsel thingie. It's on wire, so I am going to decide if I want to keep it on the wire and connect it to the hat so that it's a bit of a bobble exiting the point. I haven't yet played with it, so I don't know how I'll make that work. Maybe it should be more of a focal at the front of the hat near the band.
Then to finish it off, I need to trim the base of the hat so it's not square. I figure I will try to keep it rough, and not circular, but definately not square.
I'm also going to give it a coating of hairspray to try and keep the glitter from getting itself all over the house as I walk around :)
TFL!
Monday, October 27, 2008

SNEAK PEEK - PaperCrafts Gourmet

Hi!
It's Dee!
With a sneak peek at PaperCrafts newest delicious publication, PC Gourmet!
Here is an exclusive PC Gourmet project (complete with recipe, supply list and instructions) perfect for this week (Halloween is coming!!) Enjoy! and Happy Halloween!!!

If you are interested in purchasing a copy of PC Gourmet, you can buy it here at PC's online store! http://mailings.ckmedia.com/em/?s=3&a=3C9CACFB8D2945D1BF01EB2F4F2151D8&b=985C24


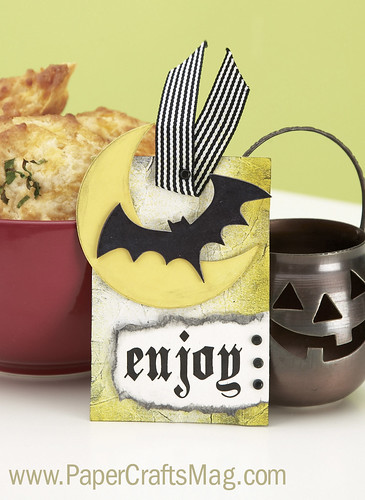
Enjoy Halloween Tag
Designer: Alisa Bangerter
SUPPLIES: Cardstock: (ivory) Dye ink: (Black) Stewart Superior Corp.; (Summer Sun) Stampin’ Up! Specialty ink: (Mango Lemonade color wash) Stewart Superior Corp. Color medium: (black chalk) Craf-T Products Accents: (black brads) Making Memories; (chipboard bat, moon) Melissa Frances Fibers: (black striped ribbon) Pebbles Inc. Font: (Black Family) www.dafont.com Adhesive: (foam tape) Finished size: 3" x 4 1/2"
1 Make tag from cardstock. 2 Crumple tag and smooth out. Spray edges with color wash; let dry. Apply chalk. 3 Ink chipboard moon; let dry. Chalk edges and adhere. 4 Ink chipboard bat; let dry. Adhere with foam tape. 5 Print sentiment on cardstock; trim and tear edges. Chalk edges and adhere with foam tape. Attach brads. Attach ribbon with brad.


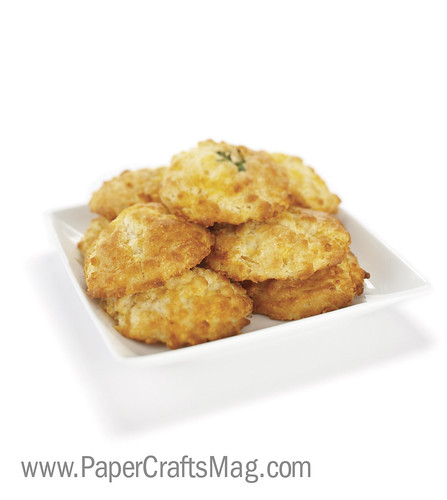
Cheesy Garlic Drop Biscuits
Alisa Bangerter
This is a perfect recipe to pull out if you are short on time because there is no rolling or cutting. The cheese and garlic add extra kick to a plain biscuit, and kids love them. They are the perfect accompaniment to serve with soups or stews, and are great served with a salad.
INGREDIENTS
2 c. flour
2 tbsp. granulated sugar
4 tsp. baking powder
1 1/2 tsp. garlic powder
1/2 tsp. salt
2/3 c. butter or margarine
1 1/2 c. grated cheddar cheese
1 1/4 c. milk
Chives (optional)
DIRECTIONS
Mix together dry ingredients. Cut in butter with pastry cutter until mixture is fine. Add cheese and mix well. Add milk and stir until just moistened. Drop by spoonfuls onto greased baking sheet. Sprinkle top with chopped dried or fresh chives if desired. Bake at 400 degrees for approx. 15 minutes.

Sunday, October 26, 2008

ATTENTION!!

ATTENTION! Outta This Funk now has its' own online community! Go HERE and sign up to become a member, and you could become one of 5 guest designers to have your work featured here on this blog! The guest designers will be notified by November 20th, so go join the fun now!

Monday, October 20, 2008

Gift Bag Mania


Jen here. I am addicted to making these gift bags right now. The big Cricut E helps makes these a fast and easy project. This little bag is one I made for a bridal shower. It's the perfect size to stick a gift card inside.

Saturday, October 18, 2008

It's almost Halloween! Time for a funky Halloween project!


Hi all!

Dee here!


I wanted to share a fun Halloween project I created recently for the BoBunny DT!

Here's a fun (albeit funky) wallhanging that I created on a whim, after playing around with some chipboard shapes. (The face is all chipboard shapes, except for the cardstock lips I cut out)...

I laid out the chipboard circles, and thought they looked like creepy, yet googly fun, skeleton eyes...so...played with a few more chipboard shapes to create the nose and mouth (and the cute little eyelashes)...pulled out my black paint...and created this fun wallhanging.
Check out more Halloween projects and cards on the BoBunny Blog...
http://bobunny.blogspot.com/

Wanna win a set of BoBunny Halloween Rub-Ons??? I would love to see YOUR Halloween projects! Post a comment (right here for this post) including a link to YOUR Halloween project...then check back here after Halloween to see if your name was randomly chosen to win the package of Rub-Ons!

Saturday, October 11, 2008

Just a little fast fun

Hey, I did this layout in about 30 minutes. I like the way it turned out, but hate the pictures-- I was HUGE! lol, oh well, I still like the layout, I am not used to using these colors. That brings me to this post. Lets see what you can scrap using colors you NEVER use! Challenge yourself! Pick out some pp that you may not like, and pair it up with a color you THINK wouldn't go- and give it a try. :D

Thursday, October 9, 2008

Hey! Remember me?!


Hey it's me...Wendy, lol!! Wow, I've been mia for way too long...but I know the other ladies took great care of everyone, just look at all these new postings with beautiful, inspirational projects!! Love it!

I have a little project to share today...I did this a little while back for my aunt who has helped in out a lot lately. I was checking out all the new stuff online and saw a few projects that had some hand stitching on them...one tiny detail that inspired me! Don't feel overwhelmed when you are looking at projects that are just incredibly detailed, take one thing you love and use that to get started. I used to do this a lot when I first started scrapbooking. I remember seeing a Becky Higgins layout and she made these cute little corners on her layout, again one small detail but I used that on my own layout and it really made it shine. So next time you see something you just adore, focus on one detail and go with it! Have fun!
xxoo
Wendy

Saturday, October 4, 2008

one more!

OK, got this cute little frog stamp-I was a little disapointed because if you go to my blog, my header has this same frog set-- only all the frogs don't come in the set, only these 2 did. Then my black ink pad wouldn't ink very well, so I had to go over it-- then I couldn't chalk very well- I think I need pratice, lol. I Didn't want to start over, so oh well, here it is. I get in a hurry and just want to get done. I already scrapped a page too, but havent journaled on it yet-- but it came out awesome! Have a wonderful evening! I think I am going to send my cards to a place that sends them to our boys overseas. :D

Another Card for Today...

Hi, Natalie here. Some of you may really be enjoying this day and taking advantage of it. I will shortly be headed to a freinds house to make some cards this evening.
(4 I think.)
5 cards in one day may be some kind of record for me :D I consider myself a little card challenged.

Here's my card for the day...

Here's another card!

This card was made using the cricut for the tree, I stamped the bird on felt, and cut it out. then I used flowers, epoxy embellies, and some rubons to finish it off. TFL!

Happy WCMD!

Hi y'all!
Teri here, wishing you all many happy hours of making cards today.
Here's a little card I made in celebration of today.


All papers are from My Mind's Eye. The chipboard letters are from American Crafts.

Hope you all are having a wonderful day.

More Cards for WCMD!

What a wonderful day! As I've said before, this day should be a national holiday! I just love all of the fabulous cards and challenges being posted all over the net today! Here are two more cards done in celebration of this day!
BonVoyage Card-by Jen Nichols

May All Your Dreams Card- by Robyn Weatherspoon


Have a wonderful day!
Robyn

Happy World Cardmaking Day :)

Hi!!! It's Dee here...wishing you all a Happy World Cardmaking Day! Here are a couple Halloween Cards to get you in a 'spookable' mood for World Cardmaking Day!! Have a fun day and a spooky Halloween! Dee

Thursday, October 2, 2008

AND the winner is........................

SUE!!
Thanks for playing sue, email me your addy, and I will get this out to you, congrats girlfriend!!

Here are some entries we had.


Here is Sue's submission with this lovely birthday card.


This was submitted by Kristin Swain, I just love this! Beautiful work Kristin!


This was submitted by Jan. lovely 2 page layout, those butterflies were/are my favorites. :D

The winner of the cricut challenge

hasn't been picked yet. :D I am sorry guys, I had a catasthphoe at home, my dog decided my sofa made a good chew toy. (oh i am very mad!) Anyway, then I had to work tonight, so I will do it when I get up this afternoon. (late afternoon). The girls have done a great job! stay tuned. :D

National park Brijuni layout with use of Cricut


Hi you all, Peggy here.

I did a simple layout with use of 2 Cricut cartridges. I used the street sign font for the title and the fabulous finds cartridge for the tab above one of the pictures. The paper and rub ons are by American Crafts. For this layout I rubbed the butterfly onto a piece of plastic (I used an empty embellishments package for this) Then I cut out the butterfly and created my own cute little embellishment. I added paint to the background and to mimic the pattern of the red paper I also stitched holes in the background of my paper for a fun effect. Hope you will like it. Thanks for looking and have a great day.